

How To Plumb A Pool Filter And Pump
Plumbing an inground pool is fairly elementary stuff, but it'due south not hard to mess it up – if yous do not have a programme and proceed carefully. The final thing you want is to have a leak clandestine because of a bad glue joint, or a sideslip fitting left unglued, or a threaded fitting without sealant.
Most of our DIY inground pool kit customers do their own plumbing, or will have a worker do it for them; there's no need to hire a professional plumber. Before nosotros get into some detail about how to plumb an inground pool, permit'south define the what, where and when.
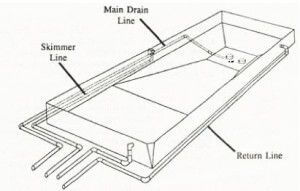 Puddle plumbing are the pipes that are buried underground, connecting the pool with the filter equipment. The suction lines, skimmer and main drain, are two pipes that connect into the puddle pump, via a 3-style valve. The return line is the pipe that carries water from the pool filter, back to the wall render inlets. Other plumbing lines may exist continued to step jets, a pool cleaner line, or fountains and water features. Puddle plumbing is done afterward the pool walls are erected, near halfway through the procedure.
The conduit or pipe that carries the ability to the underwater pool light is besides a part of pool plumbing, so nosotros'll touch on that also. And the plumbing that you do on the equipment pad, connecting pump, filter, heater, chlorinator is another of import part of pool plumbing that we'll cover below.
How to Plumb an Inground Pool
– Supplies and Materials list
 Accept some measurements, commencement of all – from your equipment pad to the skimmer, master drain, returns and any other plumbing lines. Your suction pipes (skimmer, primary bleed) typically volition come up on 1 side of the equipment pad, and the return pipes come out of the footing on the other side of the pad. If you lot oasis't erected your pool walls at this bespeak, make your best gauge on the location, but before you brainstorm to plumb, measure again, to exist sure you exercise non run short on pipes or fittings.
Our Pool Kits Include:
- 100′ – 1.5″ Sch 40 Flex pipage
- iv – ane.5″ Tee fittings
- 5 – 1.v″ 90 fittings
- 4- 1.5″ Couplings
- 4 – one.5″ Male adapters
- four – 1.5″ Street elbow
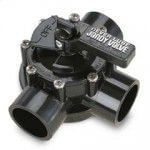
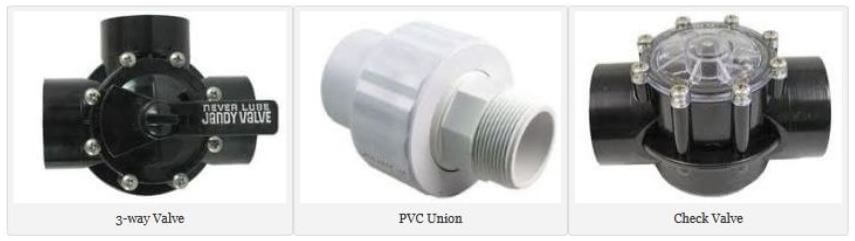
- ii – ane.5″ iii-way valves
- 2 – one.5″ Unions
- 1 Qt Ultra Grip Blue
- one Qt Royal Primer
- Teflon Record
In The Swim Pool Kits come with all you need to install an inground pool, but if your pad is located far from the puddle, or if you add a cleaner or fountain line, or additional steps jets, or a slide water line – you'll need more pipe, PVC fittings and valves.
When yous measure your plumbing runs, do not forget to add together thevertical amount of pipe needed, and the pipe, fittings and valves neededin a higher place ground, to connect the pool plumbing to the pool equipment.
Other supplies that you'll need include a measuringtape, a powersaw, either reciprocating or jig saw, with a few sharp blades. Emory cloth orsandpaper tin be used to smooth off the burrs after cutting the pipe. Teflon tape and silicone is used for threaded fittings. I like to take arag on hand, to quickly wipe up whatever glue that may ooze out, and run down the pipe – keeps information technology looking neater.
Differences in Sch 20, Sch 40 and Sch 80
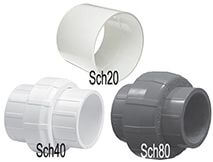
This refers to the thickness of the pipe wall. Sch stands for Schedule. A pipe labeled Schedule twenty volition take a thickness of 0.100″, and a Sch forty pipe will have a 0.150″ wall thickness. Schedule 80 pipe is a gray PVC, with a 0.200 wall. Sch eighty fittings can be used on pumps and filters, if you lot see a problem with Sch forty fittings melting and shrinking, and leaking. Sch 20 pipe should not be used on pool plumbing, or pressurized lines, Schedule 40 is standard.
6 normally used PVC fittings
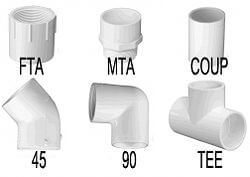
- Coupling – Used for joining two sections of pipage.
- 90 – An elbow fitting, turns the pipe 90 degrees.
- 45 – A half-elbow, turns the pipe 45 degrees.
- MTA – Male threaded adapter, Male threads 10 Slip
- FTA – Female threaded adapter, Female threads x Slip
- Tee – three-way plumbing equipment, i piping coming in, two going out.
Plumbing Your Pool Calorie-free Conduit
For the conduit that is used to carry ability wires to the pool low-cal, yous'll demand a quantity of three/4″ gray conduit, which you can buy in 10′ lengths. They have couplings built into the ends, but you may demand to buy a few 90 or 45 fittings. Conduit can be heated up and bent gently with a small blow torch, to go around gentle turns.
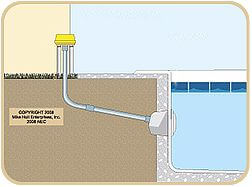 Your conduit will demand to exist run from the puddle junction box to the puddle light niche, which mounts on the wall of the pool. The junction box may exist located at the equipment pad, if that is close to the pool light, or a j-box can be mounted closer to the pool light, to come across the l′ pool low-cal cord. The j-box tin can't be closer than x anxiety from the pool, and must exist eighteen″ above the water level in the pool, equally shown in this prototype.
Run your conduit from the pool calorie-free niche, to the junction box, which is where the pool light cord meets the ability string from the breaker box, which also needs to exist encapsulated in electric conduit, rigid or flexible.
Backfill the Trenches
 I like to look to backfill the trenches until nosotros have the pool pump and filter operating; that's my method of force per unit area testing. The liner goes in and the pool is filled. Then nosotros install the faceplates and flood the lines. Let the system run for a day, and if you do non see whatever wet spots on dry soil, and then we're ready to backfill around the pool, and in the pipe trenches. Fill and compact the soil gently and so that y'all practise not put pressure on secret pipes and fittings. Water-in the soil around pipes, to exist sure dirt gets underneath, for support.
Tips for making a good mucilage joint
- Make straight cuts across the pipage.
- Remove rough edges or burrs on pipe.
- Use primer just before glue – on pipe and fitting.
- Use liberal amount of Fresh glue, on pipage and plumbing fixtures.
- Use simply deep socket, pressure fittings – Sch twoscore
- Push together and hold firm for 20 seconds after gluing.
When you reach the phase of plumbing your inground pool, the SPP Pool Experts are right there with you – set for any questions or concerns, or just to review the plan, and the supplies on hand.
How to Plumb an Inground Puddle
Continuing our series of how to build an inground puddle, we now attain the phase of plumbing your pool, to connect the pool suction and render fittings to the filter and pump arrangement. At this stage, the pool is dug, the walls are erected, and the pump and filter system are in place, on a level slab of concrete or pressure level treated wood.
In that location are different types of pipage that tin exist used for plumbing an inground pool. Almost popular is schedule 40 PVC pipage. Schedule twoscore pipe is available in rolls of flexible PVC or as rigid sticks, either ten or 20 feet in length. Black Poly pipe, also sold in rolls, tin be used. Blackness poly piping will utilize barbed plumbing fixtures inserts and clamps to connect to the pool and equipment, rather than glued PVC fittings.
The most unremarkably used pipe for inground pool construction is the 100 ft roll of flexible PVC pipe (1.5″ diameter). Having a continuous roll makes it easier to wrap around corners and you will need fewer connectors. If you lot purchased your inground pool kit from In The Swim, the Palatial or Deluxe Plus puddle kits come with everything you lot need to plumb the pool.
SPP Pipe & Fittings Kit includes: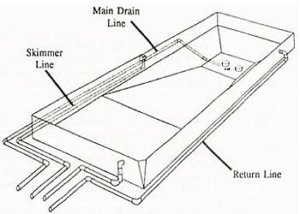
- 1-1/2″ 10 100′ Schedule 40 Flex Hose (1)
- 1-1/2″ PVC White Tee (four)
- ane-one/2″ PVC White xc-degree Elbow (5)
- ane-1/2″ PVC White Coupling (4)
- 1-1/2″ Male Adapter (4)
- 1-1/2″ PVC xc degree Street Elbow (4)
- 1-ane/2″ PVC 90 caste Street Elbow (four)
- 1 Quart Ultra Grip Blue Cement
- ane Quart Purple Primer
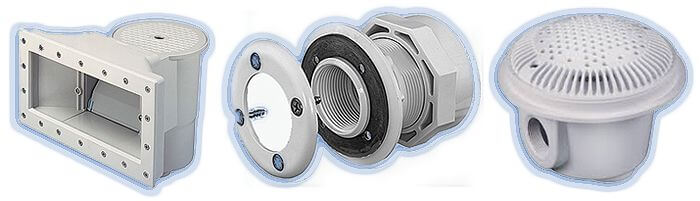
Besides included in our DIY inground pool kits – two 1-1/2″, 3-way Jandy valves and the Hayward Pool Plumbing Pack (widemouth Skimmer, extension collar, vacuum plate, two Returns, ii VGB Main Drains). With these supplies, y'all are fix to kickoff plumbing your inground swimming pool!
Plumbing the Main Drains:
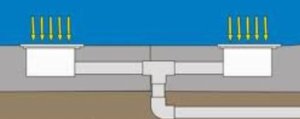 New main drain safe laws require the use of dual principal drains, to prevent entrapment on a unmarried main drain. Dig a minor pigsty in the bottom middle of the flooring, and place the 2 primary drains, three ft apart from each other. Run a flake of pipe between the 2 drains with a Tee fitting in the heart of the pipage. From the Tee, connect a pipe that volition run through the deep cease slope, up underneath the wall. Once outside of the wall, run this pipe all the way back towards the filter pump. Connecting your main drain pipe into the skimmer is not recommended; this method won't let you to accommodate the suction of the main drain and skimmers independently.
Plumbing the Skimmer:
If y'all haven't done and so already, connect the Hayward widemouth skimmer to the wall console with the cut-out. Connect a pipe to the rear hole of the skimmer, leave the front hole plugged. Use Teflon tape and silicone sealant on the fitting, and tighten securely, merely don't over-tighten equally you hazard cracking the skimmer body. Connect the pipe to the fitting at the skimmer lesser, and run this pipe back to the filter pump.
There are 2″ holes at the bottom of each skimmer, one gets plugged (unremarkably the forepart pigsty) with the PVC plug included with the skimmer. Be sure to use Teflon tape and a little pipe dope or silicone to prevent leaking. In the other hole of the skimmer, thread in a pvc pipe connector and gum your skimmer piping into the fitting.
 The next step is to connect the skimmer line and the main drain line into the pump. Install an MTA (male threaded adapter) fitting into the front end port of the puddle pump. Apply a proper thread sealant so there won't be any air leaks. Once the MTA is installed, gum a 6-12″ piece of rigid PVC piping, into the fitting. Glue the other stop into the port labeled "Inlet", on one of your 3-fashion Jandy Valves. One the other two side ports, glue in the 1-1/2″ Street Elbows, with the opening pointing down to the footing. Finally, connect your pipe from the skimmer and principal bleed into these 2 Street Elbows.
Some people building their own pool will use rigid PVC on the plumbing that is visible to a higher place ground, which looks a little better, and can provide more rigid support. If you want to practice the same, cutting the flexible pipe at the lesser of the trench and gum it into a SlipxSlip elbow fitting which points up toward the street elbow you glued into the Jandy Valve. In between these two elbow fittings, employ a slice of rigid, schedule 40 PVC. Lengths of rigid PVC can be purchased at whatever home shop, or plumbing supply house.
Plumbing the Returns:
 The 24″ sand filter that is included in our Deluxe inground pool kits will have a multiport valve that mounts on the tiptop of the filter tank. This valve has iii ports, one labeled Pump – connect a pipe from the pool pump into this port, and ane labeled Return – connect a pipe from this port towards the port labeled "Inlet", on your other 3-fashion Jandy Valve. Using rigid pipe for these connections will look better, only is non required.
Coming out of the 3-mode Jandy Valve, at 3 o'clock and 9 o'clock, you volition again glue in two Street Elbows, pointing direct downwards to the ground. Mucilage ii equal lengths of rigid PVC into these Street Elbows, and on the other end, into two sideslip elbows. And then glue your flex pipage into the other side of the elbows, and run your pipe to where the two returns are located, typically on opposite sides or ends of the pool. From your filter organization, choose the shortest route around the pool, to reach the wall returns.
 If you lot have more than than two returns or two suction lines, yous can add another valve, either a ball valve or a Jandy Valve, onto the return or suction-side manifold. Using a valve is important on each line, so that you have the most control over where and how your water flows.
Plumbing a Puddle Heater:
If you have a pool heater you would do the return side plumbing a footling differently. We will plumb the return side the aforementioned manner, except that coming out of the multiport valve port labeled "Return", we first run the pipe in and out of the heater. From your filter to your heater (or heat pump) and so out of the heater to your return side Jandy Valve, where the h2o splits into the two split render lines going back – "returning" to the puddle.
Plumbing Other Puddle Equipment:
Our Deluxe pool packages include an Off-line chemic feeder. To install this you only demand to drill 2 small holes in the return pipe. If you are installing a saltwater chlorine organization or an In-line chemic feeder – yous would install theseafterwardthe filter, andafter whatever pool heater, on the return line –before the render side Jandy Valve.
If yous add together whatever water features such as a waterfall, or deck jets, or equipment similar a slide or a pressure level-side (return-side) pool cleaner – these will exist fed water from the return side as well. Typically, a tee fitting is installed on the return line, with a valve below the tee plumbing fixtures, to command how much water is delivered or pumped to the device. Alternatively, instead of a tee fitting and a 2-mode valve, you can install some other three-way Jandy Valve to control the amount of h2o delivered to other equipment.
Plumbing with Black Poly Pipe:
Black Polyethylene pipage tin be purchased in long rolls, and is joined together using barbed PVC insert fittings, which are secured by stainless steel clamps around the pipe. Before inserting the plumbing equipment, apply pipe dope to the barbed fitting and insert the plumbing equipment deep into the pipe. Double clamp the pipe over the plumbing fixtures with 2 clamps going in contrary directions. Tighten securely with a nut driver, so heat the pipe slightly with a torch. While however hot, tighten again on the clamps to improve the seal.
Black Poly pipage is not glued together similar PVC pipe. Because of this, the joints are more likely to cause leaking problems years down the road. This is why some builders scoff and contemptuousness at the idea of using Black Poly pipe. If however, yous decide to use Blackness Poly, attempt to apply as few underground connector fittings equally possible, to reduce this possibility. The advantage of Blackness Poly pipe is that information technology tin be purchased more cheaply than PVC pipage. This can salve a few hundred dollars on large pool installations.
As described in a higher place, some DIY inground pool builders will employ Black Poly hugger-mugger, up until the equipment pad, so come out of the basis with rigid schedule 40 PVC, for a more secure and professional looking filter arrangement installation.
Pressure Testing your Puddle Plumbing:
If you want to exist sure that your puddle plumbing job was done well, without leaks – before backfilling over the pipes, you can force per unit area examination the plumbing. This is done after all plumbing connections are complete, including the filter arrangement plumbing. Allow the glue to cure for 24 hours.
Builders will usually have a bootleg PVC pressure testing stick with a guess. This is continued to the skimmer, so all the other ports (main drains, returns, etc) are plugged at the pool using rubber expansion plugs. An easier method than building a pressure stick is to buy a Drain Male monarch. Available at almost home stores, you connect this to a garden hose, and push it into the skimmer. Plug both drains and returns, open up all valves. Open the air bleeder on the filter to let the air to escape. Turn on the garden hose and the plumbing will make full up with water. Carefully check the entire run of plumbing for whatever leakage. It should exist water tight, not even a drib should exist discovered. Congratulations, now yous tin backfill over the pipe and up against the walls.
 Our inground pool kits come with a starter plumbing kit. We requite you valves, unions, contrasted schedule 40 PVC fittings and 100 ft of schedule 40 flex pipe. In some cases you volition demand additional pipe, depending on the size of the pool, how many returns and skimmers, and any other water features y'all are planning, and the distance to the pool equipment. Actress pipage can be ordered at the time of the puddle kit buy and delivered along with the kit, or you can become extra piping locally, either flex or rigid PVC.
Flex or Rigid PVC Pipe?
Flex pipe is much easier to piece of work with; it lays flat in the trenches and makes turns without using menses restricting fittings. It likewise compacts in the soil more fully, and is less likely to break under compaction. Rigid PVC pipe is stronger against chemical deposition and resists problems from earwigs in the soil.
Many of our customers utilise rigid PVC where the pipe comes up out of the ground, and use flex pipe for the undercover plumbing. Connecting the equipment with rigid PVC in a higher place the ground, looks neater, and makes the equipment less probable to move.
one.5″ or 2″ PVC Plumbing?
If you are upgrading to a Variable speed pump and filter with 2″ ports, it is a proficient idea to increase the piping size to 2″ instead of the standard 1.v″ pipe. Variable speed pumps need two inch piping to give a amend menses and nearly price savings – which is why you lot are purchasing the variable speed pump. Large water features, or powerful spa jets are some other area where 2″ pipe may be used.
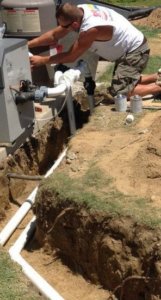
Puddle Plumbing Trench
When your pool is beingness dug, take the operator dig a trench from the pool to where your pool equipment will be (your equipment pad). This volition save you from paw excavation a pool plumbing trench after the machine leaves your thou. Brand sure it is at least virtually ii ft wide and at to the lowest degree two ft deep. This will ensure plenty room to fit all your pool plumbing lines and electric conduit besides.
How Deep Should Pool Plumbing Pipes be Cached?
Your plumbing lines should be about 2 ft underground to protect them from surface soil slip and shift and from freezing temperatures. If your pool is in the southern U.S., with rare freezing temperatures, you can bury your puddle pipes a bit shallower, but if you lot can go deeper, it's always a good idea. And, do not forget to call your local Dig Safe service, to have your utility lines marked (for free), before kickoff whatsoever digging in your backyard.
If you're in a cold weather climate, y'all will demand to winterize your lines and equipment before freezing temperatures hit. This is washed by blowing the lines and equipment out with a minor compressor or blower vac. After the lines are cleared of water, the returns and skimmers are plugged at the pool, to keep h2o from re-entering the pipes during the winter.
Plumbing your Pool Pump and Filter
Plumbing your Equipment Pad
- Space out your equipment for airflow and serviceability.
- All pipes coming out of the ground should accept the same superlative.
- Use equally few 90's as possible, to reduce resistance.
- Allow some room for time to come expansion.
- You can run a pipe for future employ, capped off at the pad.
- Route your plumbing abroad from your electrical panel.
Your equipment pad is preferably a steel reinforced concrete slab, but heavy duty HVAC skids, set on a 4″ gravel base tin can also be used. Set your pump, filter, heater, etc., on your equipment pad in a logical order, leaving lots of room for future repairs or service. Also keep in mind whatever codes that may exist for placement. Heaters or heat pumps have special installation requirements.
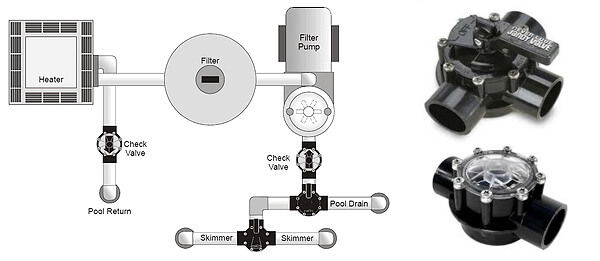
Now that you have all your lines run from the pool to the pad it is fourth dimension to start connecting to your equipment. Lets start with the pump. In the front of the pump install a PVC wedlock (not shown), and from that connect a short piece of piping into a 3 manner Jandy valve.Unions are useful for removing the puddle pump easily for service or indoor winter storage.Check valves can exist used if desired; they are especially helpful if the pump and filter is located more than 12″ to a higher place water level.
Clean and glue your main drain pipe into 1 side of the valve and your skimmer to the other side of the valve. If there are two skimmers, a 2ndiii-manner valve is used, as shown in the pool plumbing diagram above. After the pump install a union, and and so plumb to the inlet of your puddle filter. If you lot have any other accessories that is where you pipe to next from the filter afterwards putting in a union and and then pipe to either a heater, heat pump, salt system or anything else then from there to a Jandy 3-way valve. In i side of the valve goes your pace jets and in the other side goes your return fittings.
Puddle Plumbing Techniques

When gluing PVC pool piping into couplings, unions, valves or other fittings or connectors, the proper mode is to clean the within of the fitting and the exterior of pipe, get it practiced and clean with a PVC primer. A expert dominion of thumb is clean information technology until you no longer see any writing (or dirt), so you know its clean. Inside 15 seconds of cleaning, apply a liberal coating of fresh PVC glue on the within of the fitting and the outside of the pipe. Push the piping fully into the fitting with a small turning twist, and hold it for thirty seconds before releasing.
Threaded fittings require extra care to prevent cracks and leakage. Use 3-4 wraps of Teflon tape, in a clockwise management around threaded male fittings. For extra security, first spread a thin layer of silicone or pipe dope over the threads, before wrapping with Teflon record. When tightening threaded fittings into pumps, filters, heaters, chlorinators… be careful not to over-tighten, but turn only one-2 turns across hand tight.
Puddle Plumbing Tips
- Brand a plumbing diagram, measure twice – cutting once, and dry fit everything together first, before gluing your pipes and fittings.
- Use as few 90's and 45's as possible, to proceed total system resistance as low as possible. Remove unnecessary turns in the plumbing.
- Higher up basis pipes should be supported, and allow room to service equipment and move around without damaging pipes.
- Exit at to the lowest degree vi″ of clear directly piping on both sides of any piece of installed equipment.
- Plumb in order, from Pump to Filter to Heater to Chlorinator or Table salt System.
- Avert plumbing loops where freezing water may go trapped.
- Make straight pipe cuts with a abrupt hacksaw, or reciprocating saw.
- De-burr the pipe after cut, using rough sandpaper.
- Clean the pipe and fitting immediately before gluing with PVC pipe cleaner.
- Use PVC glue liberally to both plumbing fixtures and pipe, and quickly join, with a twisting motion.
- Hold the joint together for 10-15 seconds earlier releasing.
- With a wet fabric, wipe off whatever excess glue.
- Use a layer of silicone (I like Blue RTV) on threaded fittings, then three layers of Teflon tape, wrapped over the threads in a clockwise management.
- Don't over-tighten threaded fittings into pump, valve, skimmers, drains. Hand tight, plus 1-1/2 turns with big pliers.
Future Piping Plans
If you know when you install your puddle that down the road you may want to add some water features, or an automatic pool cleaner, it is a good thought to run the cloak-and-dagger piping when you install your inground pool kit. Unused pipes can merely "stub-up", out of the ground at the equipment pad, and be capped off above ground level for fountains, or continued through the pool wall with a wall render plumbing equipment.
At the filter terminate these would necktie in on the filter side or return side of the equipment, yous can just stub it up there and cap it too. Any water features should have their own valve to turn them on and off, you could install it at present on the return side of the equipment, stub a slice of PVC out of it and mucilage on a cap at the end and when y'all do install your waterfall or whatsoever the water feature – yous'll be fix to go.
Plumbing your own swimming pool, as you build your backyard paradise is no big deal. With the trench dug, the pipes from the puddle to the equipment pad and back to the puddle tin can be connected in just a few hours.
If you have whatsoever questions near inground pool kit plumbing, or run into whatever troubles while plumbing your inground puddle, requite our pool plumbers a call hither at In The Swim – we're hither to help!
 I hope that this petty article virtually how to plumb and pressure test a swimming pool has been helpful and informative. Puddle plumbing is non hard to do, just be sure to plan each section of pipes and fittings. Thousands of homeowners just like y'all have figured out how to build an inground pool, from pool guys like me. Plumbing an inground pool is one of the fun parts of building your ain inground puddle – enjoy it.

Larry Weinberg
In The Swim Pool Expert

How To Plumb A Pool Filter And Pump,
Source: https://blog.intheswim.com/inground-pool-kit-plumbing-how-to-plumb-a-pool/
Posted by: camposbaccomithe.blogspot.com
0 Response to "How To Plumb A Pool Filter And Pump"
Post a Comment